Analyzing Scan Results
In this lesson, you will learn how to view subsets of the Scan
Results table to better help you in your analysis of the i18n
issues.
There are a variety of ways to "divide and conquer" your i18n
issues. These include:
- display only the results for a selected file or directory
- create and use views on the results
- display a specific issue in the context of its source code
- permanently filtering "false positives"
Show Results Based on File or Directory Selection
Use the Project Explorer to display scan results for a file
or directory selection. This is especially valuable when you're
working on a team and have divided up the work by source code.
Right-click on the file simple.aspx and select Globalyzer=>View
Scan Results For from the menu. Notice that the Scan Results
table shows just the results for that file:

To restore to the full set of results, right-click anywhere in the
Project Explorer view and select Globalyzer=>View All Scan
Results from the dropdown menu.
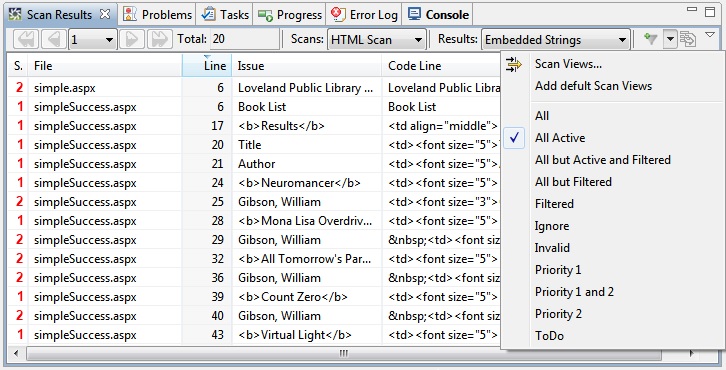
Displaying Views of the Scan Results
Another way to create a subset of the Scan Results table is
to use Globalyzer's Scan Views feature. It can be used to allow you to
display issues based on something they all share. You can set a
view based on text found in any of the Scan Results table
columns. To see how this works, let's create a view based on
common text in the Code Line column.
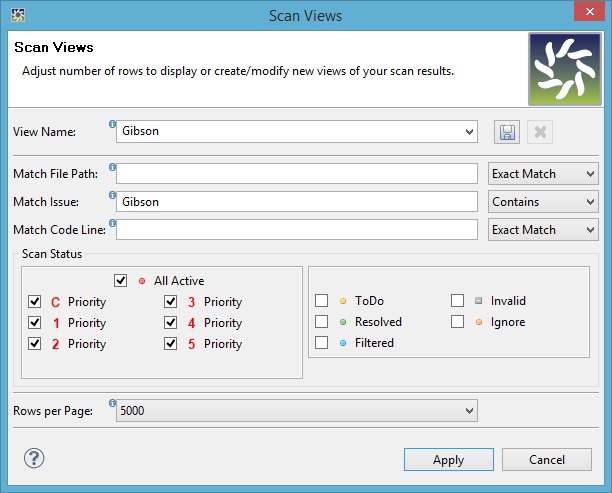
Open the Scan
Views dialog the same way you did in the previous section of the
tutorial (see below screenshot).
Fill in the new view as shown here. Be sure to specify that Match Issue should be
set to "Contains" not "Exact Match".
Click the Save button 
You can add multiple Scan Views. Make sure that the Gibson scan view is selected and click Apply.
You'll now see only the issues that match the Gibson
settings.

Let's use this feature in combination with the Status
feature to further filter the Embedded String Scan Results.
The purpose of the Embedded String Results table is to list
strings that you need to externalize from the source. Since Gibson,
William is an author's name and should not be translated;
we will
use those rows to demonstrate modifying the Status to remove rows
from the Active Results table.
-
Highlight all rows containing the word Gibson, which in
the current view are all the rows in the table.
-
Right-click over one of the selections.
-
Choose Invalid from the pop-up menu and
those rows will no longer appear in your Active Results table.
-
Select All Active from the Scan Views dropdown
to display the other results.
For more information on creating, saving and deleting Scan Views,
click here.
Note: Scan Views apply to all your result
types (i.e. Embedded Strings, Locale-Sensitive Methods,
Static File References, General Patterns), not just the currently
displayed Scan Results.
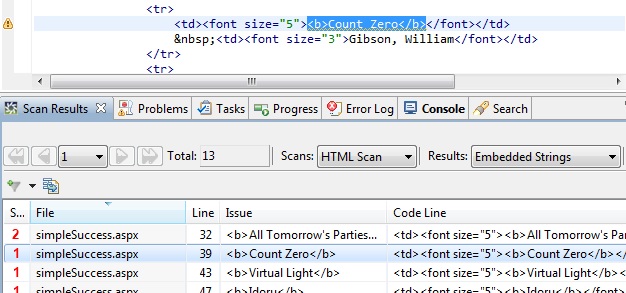
Displaying Issues in Source Files
The Scan Results table lets you directly open the source
file associated with a row.
1. Locate the issue Count Zero in the middle of the
Result Table's Issue column
Tip: If this were a very large table, with thousands of
entries, you could also use the Scan=>Search in Scan Results... feature to
locate a specific issue. Be sure to first adjust the Rows
per Page at the bottom of the Scan Results view to include as
many rows as possible since Search in Scan Results... only operates
on results in the current page. You can do this by going back to
Scan Views. For each of your scan views, the option to alter
the number of rows per page will be near the bottom of the dialog.
See the Scan Views screenshot above.
2. Double-click anywhere in the row containing the issue Count
Zero.
The source file where the issue occurs is automatically opened in
the Source Files view and the issue is highlighted, as
shown below.
Permanently Removing Issues from Scan Results
Once you complete a scan, you will often see that the results
either contain "false positives" (rows in the Scan Results
table that are not valid problems) or in the case of HTML scans,
the results are correct, but you would like the embedded strings
to include or omit their surrounding style tags.
(As we saw in the previous lesson, you can refine the
scanner results by modifying the Include HTML Tags in your
Globalyzer HTML Rule Set.)
You can permanently remove false positives from
future scans in the following ways:
1. Rule Set Customization: When you add a rule set filter, it will
be applied to all your source and is a good way to remove many false positives
at once. For example,
to remove false positives from the Embedded Strings scan, you can add
String Content
Filters, String
Method Filters, String
Variable Filters, or String Line
Filters.
There are similar filtering capabilities for the other scan types.
Use Method Line Filters to remove Locale-Sensitive Method
false positives; use Static File Filters and Static
File Line Filters to remove Static File Reference false
positives; and use General Line Filters to remove General
Pattern false positives.
Globalyzer supports two ways to modify rule sets. As you saw in the
previous lesson, you can click on the View Scan Rulesets
button  in
the Toolbar. This will take you to the Globalyzer Server,
where you can select your rule set and make any changes. Then, select
Project=>Reload Rule Sets and rescan by clicking on
the Scan button in
the Toolbar. This will take you to the Globalyzer Server,
where you can select your rule set and make any changes. Then, select
Project=>Reload Rule Sets and rescan by clicking on
the Scan button  in
the Toolbar. in
the Toolbar.
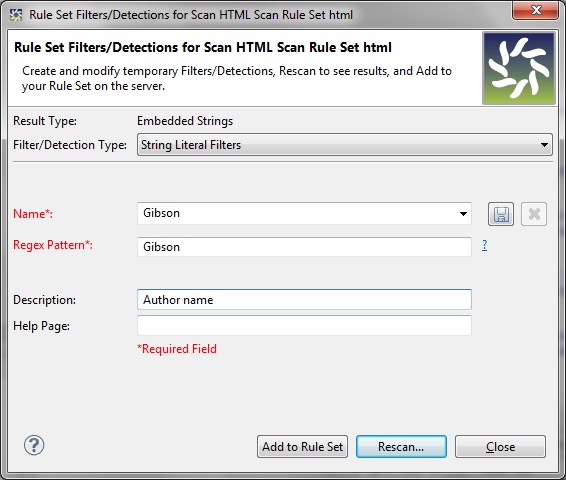
Here is another way to directly add filters (and detection patterns)
from the Globalyzer Workbench. Display Embedded Strings,
right-click in the Scan Results view and select
Add Rule Set Filter/Detection. In the dialog, you can choose
the type of filter or pattern, enter all information, save it locally by clicking
Save . Select the Rescan... button
to see
that it works as expected, and then, when this and any other filter/detection patterns
are ready to become a permanent part of the rule set, click Add to Rule Set.
For example, we could add a String Literal Filter
to filter out strings containing Gibson as shown here:
Note: The Add Rule Set Filter/Detection dialog is tied to the type of currently-displayed
results. To add filters or patterns for other result types, first select
Embedded Strings, Locale-Sensitive Methods, General Patterns or Static File References
from the Results dropdown,
and then display the Add Rule Set Filter/Detection dialog.
2. Append an Ignore Comment to the end of the source code
line: Use this approach when there are not many false positives
of this kind and you want to ensure that this specific issue is never
detected in the future. Select one or more rows in the Scan Results table,
right-click, and choose Ignore This Issue to
ignore a single issue, or Ignore This Line to
ignore all issues on the line of code. As an example, consider the
issue "Count Zero." We will later wish to translate
Count Zero, so you should not actually try to ignore it.
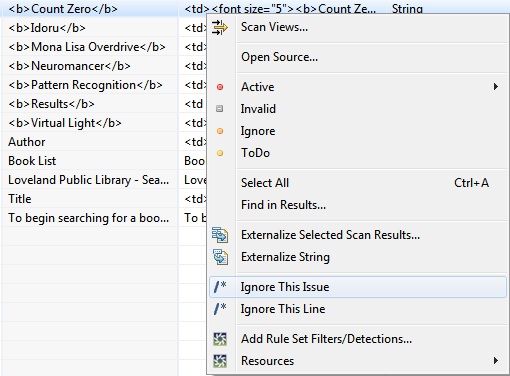
However, if you did, you could select
its row in the Scan Results table
(double-click so that it also opens in the Source Files
view), right-click the row, and select Ignore This Issue
from the dropdown:
A comment would be added to the end of the source code line
as shown here:

Globalyzer would then automatically rescan the file and remove the entry
from the Scan Results table.
3. Insert an Ignore Comment above the source code line:
Another way to ignore issues in subsequent scans is to use
Globalyzer's other supported ignore comments:
Ignore Next Line, which inserts a comment above the currently select line and
Start Ignore and End Ignore comments, which can be
used to surround a block of code to ignore. For example, click
somewhere in the currently-open simpleSuccess.aspx file,
select Fix Code from the Menu bar. You will see the various choices
in the dropdown menu.
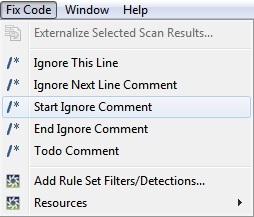
You can also choose to insert a To Do comment, which won't
affect the Scan Results table, but will allow you to put a
permanent note in the file.
For information on setting the comment text itself in the Manage
Scans dialog, click here.
In the next section, you will prepare Globalyzer to fix the Active
issues listed in the Scan Results table.

 
|
