Scanning Source CodeThis section describes how to scan source code with the Globalyzer Workbench and how to use the Scan Results view to manage the internationalization issues detected by the scanner. This section discusses the following topics:
Create a Project and ScansBefore you scan code, the Globalyzer Workbench must be configured appropriately. Here is a checklist of tasks you need to do to prepare to scan code:
Starting a ScanIn this section, you will learn how to view source files in the Editor view and how to perform a source code scan.
Scan Results and ReportsA Globalyzer code scan can produce three different types of output.
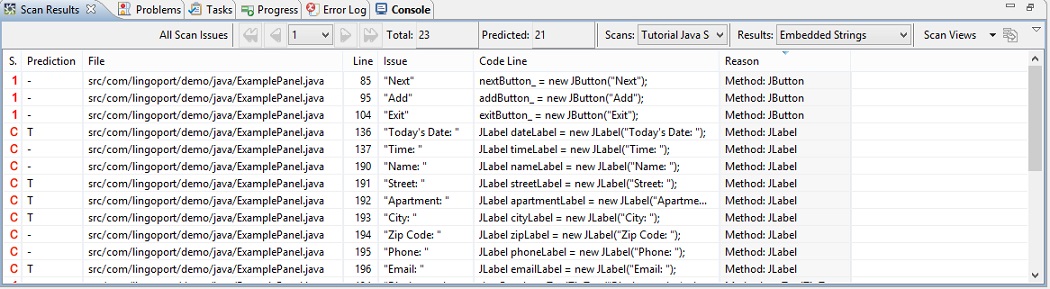
When you complete a scan, the Scan Results table generated by the scan is automatically displayed in the Scan Results view. A report is also automatically opened in the All Predicted Scan Summary view. Scan ResultsThe list of all candidate i18n issues is displayed in the Scan Result table view. This table is at the heart of managing i18n issues.
The Scan Results table itemizes each potential internationalization problem that was detected and reports the following information:
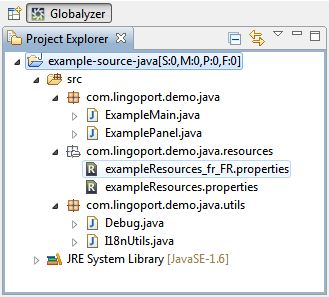
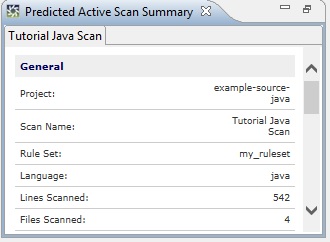
The Scan Results data is stored in the database you chose during the Globalyzer installation process. If you chose the default, it will be in your home directory. The default directory for the database files is called .globalyzer. The Scan Results table is used to filter, edit, and fix issues. For detailed information on using the Scan Results table, see the following section Editing Scan Results. All Predicted Scan SummaryIn addition to the Scan Results table, a summary of the results is displayed in the All Predicted Scan Summary view (bottom left corner). This includes information about lines of code scanned, issues found, and in the case of Locale-Sensitive Methods, links to information that can be used to understand and address their i18n issues. Note that the Locale-Sensitive Methods that were detected are listed and that they are hypertext links. Click these links to learn more about the locale-sensitive methods and techniques for re-coding or replacing them. A summary of the candidate active i18n issues is displayed in the All Predicted Scan Summary view.
Generating ReportsTo generate a report of your scan results:
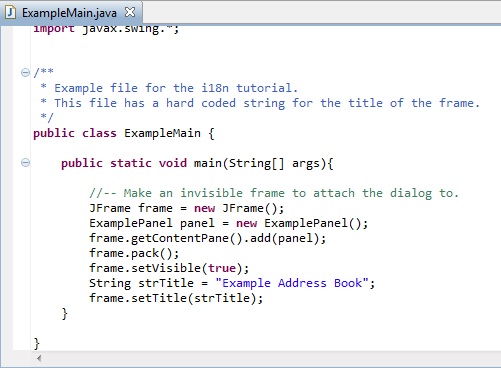
Click here for more information. Source FilesOpening Source FilesTo open a source file in the Editor view, do one of the following:
Saving and Closing FilesTo close the file, do one of the following:
Editing Scan ResultsIn addition to displaying all the issues found during a scan, the Scan Results table supports various editing features that can help you to categorize and narrow down the scope of the code-fixing effort.
The Results Table provides these basic editing functions:
Sorting Scan ResultsYou can sort the Scan Results table by any column. Just click in the header of a column to sort the data in ascending order. Click again to sort data in descending order. By clicking on the status column (the upper left column in the Scan Results table), you can sort the active issues by priority, seeing the issues Globalyzer found to be most important, first. Searching Scan ResultsTo search for text in the current page of the Scan Results table, do one of the following:
The Search dialog box displays with the Scan Result tab selected. For detailed information on this dialog, click here. Changing Priority of Scan ResultsEach active issue has a priority. The priority can be 'C', indicating a string concatenation, or the priority can range between 1 and 5, with 1 being the highest - i.e. the most likely to be an internationalization issue. For Locale-Sensitive Methods, Static File References, and General Patterns, the priority is configured in the detection rules of the rule set. For Embedded Strings, priorities can be configured in detection rules, such as String Content Patterns and String Method Patterns. If a string is detected by these rules, the configured priority is assigned to the issue. If not, Globalyzer assigns a priority based on the content of the string. For example, a string containing words found in the dictionary will get a higher priority (more likely to be displayed to the end user and therefore more likely to require externalization) than one with words not found in the dictionary. Other considerations for assigning priorities to Embedded Strings include capitalization and punctuation found in the string. Priorities help focus efforts on the most important active issues. Although Globalyzer assigns each issue a default priority, you can choose to set the priority to something else, and in this way you can organize which issues you want to focus on first. You can change the priority of a single row, multiple contiguous rows, or multiple non-contiguous rows. To select a single row, click in it. To select multiple contiguous rows, click on the first row then press the left mouse button and drag (or shift-click on the last row). To select multiple non-contiguous rows, click each row while holding down the Ctrl key. To change the priority of the selected row(s), right-click and choose the appropriate Active=>Priority. Changing Prediction of Scan ResultsEach issue has a prediction value. The prediction value is used to determine true issues from false positive issues. The default prediction value is dash (-). If you know an issue is a true issue, you can set its prediction to T. If you know an issue is a false positive, you can set its prediction to F. If you aren't sure if an issue is true or false, you can set its prediction to P, for pending. This indicates that you have evaluated the issue, and will make a final determination later. You can change the prediction of a single row, multiple contiguous rows, or multiple non-contiguous rows. To select a single row, click in it. To select multiple contiguous rows, click on the first row then press the left mouse button and drag (or shift-click on the last row). To select multiple non-contiguous rows, click each row while holding down the Ctrl key. To change the prediction of the selected row(s), right-click and choose the appropriate Mark Prediction option. Note: After modifying predictions, select Machine Learning->Export Prediction Report to save the markings to a file. The Prediction Report can later be shared and imported by other Workbenches, or used by Globalyzer Lite when scanning with results reflected on the Dashboard. Note: Be careful when setting predictions. If the source code changes significantly, prediction settings may be lost. Also keep in mind that when Scan Results are deleted, predictions changes are deleted as well. To restore, after scanning, select Machine Learning->Import Prediction Report (if you previously exported one), to update your Scan Results with the saved predictions. Machine LearningAnother way to pare down Scan Results is via Machine Learning. To use Machine Learning, mark the prediction of some Scan Results T (issues you know are true issues) and F (issues you know are false positive). Then select Machine Learning->GO! Machine Learning will predict every active issue that doesn't already have a prediction value of T, F, P, or DFP. It will assign ML True if it believes the issue is a true issue, ML False if it believe the issue is a false issue, and ML NULL if it can't decide. If you find that issues predicted as ML False are indeed issues, please right mouse click on the issue and select Mark prediction: TRUE(T); the next time you run GO!, Machine Learning will learn your correction. If you are not satisfied with the prediction results, please continue marking more issues as F or T, and rerun Machine Learning. Once you are satisfied with the prediction results, the issues with a prediction value of T, P, ML True, or ML NULL are the true issues that need to be addressed. The issues with a prediction value of F, ML False, or DFP can be ignored. The suggested way to view the predicted active issues is to select Scan Views->All Predicted Active. After reviewing the predictions made by Machine Learning, you can either leave them as they are (ML True, ML False, ML NULL), or you can set the ML True ones explicitly to T, the ML False ones explicitly to F, and the ML NULL ones to either T or F. The difference between ML True and T is that the former is a suggestion from Machine Learning, while the later is an explicit decision. If you leave them as suggestions, then further runs of GO! may end up with different suggestions. Sub-setting Scan ResultsFrom the drop down at the upper-right corner of the Scan Results view, click Scan Views to create a sub-set filter for your Scan Results. Sub-setting is useful when you have many results that you want to address in more manageable chunks. For example, in C++, you could create a View for your Embedded String scan that just displays AfxMessageBox calls. The view is applied to all results, not just the current page's results. Once you've created and saved a view, select it from the dropdown. Globalyzer has a set of predefined Scan Views, including All Scan Issues, All Predicted Active, and Filtered issues. Click here for information on this dialog box. Another way to pare down what is displayed in Scan Results is to set the view via Project Explorer. Project Explorer lists all the directories and files for your project. If you select a directory or file, right click and select Globalyzer/View Scan Results For, only results from within that directory or file will be displayed in Scan Results. To reset to display all results, right click in Project Explorer and select Globalyzer/View All Results. Note: Only one file or directory may be selected to set the View via Project Explorer. Refining Rule SetsAfter scanning your code, you might wish to return to your Rule Set and edit it to refine the results of a subsequent scan. It is possible that you will do this iteration more than once. Say, for example, your code contains numerous calls to a proprietary method called getSystemInfo. This method takes a string argument that is simply the key to retrieve some information needed by your application. This string is never displayed in your application's user interface, but it keeps showing up in the Globalyzer Results Table as an issue.
To removes these issues from the Scan Results, you can go into the Rule Set you used to scan the code and add a new String Method Filter: getUserInfo. When you rescan the code, Globalyzer will make sure that each string it detects is not an argument to getUserInfo before it is added to the Active Scan Results. Note: When you find Active issues that should be filtered, you can select these issues and email them to Lingoport. Simply right click in the Scan Results Table and select Report as False Positive. While this won't help you with your current scan, it will help us refine the default Rule Sets for future scans. Rule Sets can be refined from within the client (in a limited fashion) or from the server. Refining Rule Sets from ClientNew filters and detections can be created on the client, tested against your code, and submitted to the server to become part of your Rule Set. This provides a quick way to fine tune your Scan Results. 1. Right click in the Scan Results table and select Add Rule Set Filters/Detections. 2. Choose the Filter/Detection Type and fill in required fields. Save. 3. Select Rescan and leave checked the filters/detections you want to test. 4. Look at the results of your filter/detection in Scan Results. Make modifications as necessary. 5. Select Add to Rule Set and leave checked the filters/detections you want added. To create string filters/detections, view Embedded Strings results in your Scan Results before displaying the Add Rule Set Filters/Detections dialog. To create locale-sensitive method filters/detections, view Locale-Sensitive Method results in your Scan Results before displaying the dialog. You may create several of these temporary filters/detections before scanning with them or adding them to your Rule Set. Once added to your Rule Set, a temporary filter/detection is deleted from the client. Refining Rule Sets from ServerThe advantage of refining Rule Sets from the server is that you can see and modify all your existing filters/detections in addition to adding new ones. When refining from the client, you can only add new filters/detections. 1. Log On to the Server
2. From your home page, click My Rule Sets. 3. In the My Rule Sets page, select the name of the Rule Set you wish to edit. 4. Click on the link to add filters and detection patterns to your rule set. The choices are:
For detailed information on modifying each of these types of rules, click here. Inserting Ignore CommentsUse Globalyzer's Ignore Comments feature to insert the following types of comments into your source code:
To insert a comment into a source file, either double-click on the Scan Results Issue to set the cursor position and do one of the following:
You can change the default text associated with comments (except the format for Ignore This Line) in the Manage Scan wizard. To bring up the wizard, click Scan > Manage Scans. |

 in the toolbar
 User's Guide Contents