Getting Started with the Globalyzer WorkbenchThis section discusses the following topics: Installing the Globalyzer WorkbenchTo install and start the Globalyzer Workbench, login to the Globalyzer Server and then click on the Download the Globalyzer Client link at the bottom of the page. Select the appropriate installer and follow the instructions.
If you do not know what to enter here, see your Globalyzer administrator. If your company has a Globalyzer Server license, this administrator will be within your company. If you are operating under a Globalyzer Client license only, you can contact the Lingoport Globalyzer administrator at support@lingoport.com. After you have been successfully logged into the server, the main Globalyzer window appears. Installing the Globalyzer Workbench via a ScriptIf you wish to install Globalyzer on multiple machines, you can choose to generate an automatic installation script that allows you to run the installation unattended from the command line. On the last page of the GUI installation, click Generate an automatic installation script and name the file something like: auto-install.xml. Then put this file in the same directory as the Globalyzer Installer on another machine. To run: java -jar [Globalyzer Installer].jar auto-install.xml The generated script mimics the decisions made during the GUI installation. One decision made was the kind of database to use to store information: HSQLDB (the default) or MySQL. If the database choice varies from user to user, you can generate two scripts: auto-install-hsqldb.xml and auto-install-mysql.xml. Simply run the GUI installation twice (uninstall in between) and choose a different database each time. The script may need to be modified before running on another machine. In particular, the installpath should be specified appropriately (as well as the paths found in the shortcut tags near the end of the file). If you are installing to a MySql database, you may need to modify the jdbcHost, jdbcPort, jdbcUsername, and jdbcPassword in addition to installpath. Scripts generated on one platform can be used to install on another platform. Simply use the same script with the platform-specific installer. Note: On Windows, if running the auto-install and it brings up the GUI instead, it could be due to permissions. Select Control Panel, User Accounts, Change User Accounts Control Settings. Then slide the bar to Never Notify, OK, and reboot machine. Logging into the WorkbenchThe first time you start Globalyzer, you are asked to provide login information. This information is used the next time Globalyzer is launched. If you would like to change users or connect to a different server, select Window=>Preferences=>Globalyzer=>Login and Server/Proxy Settings sections, make modifications and Apply. Connecting to Lingoport DashboardIf you would like the Workbench to connect to the Dashboard (to refresh the Workbench with False Positive issues from the Dashboard), you need to provide Lingoport Dashboard login information. Click on the Windows menu and choose Preference. Select Globalyzer=>Lingoport Dashboard Settings 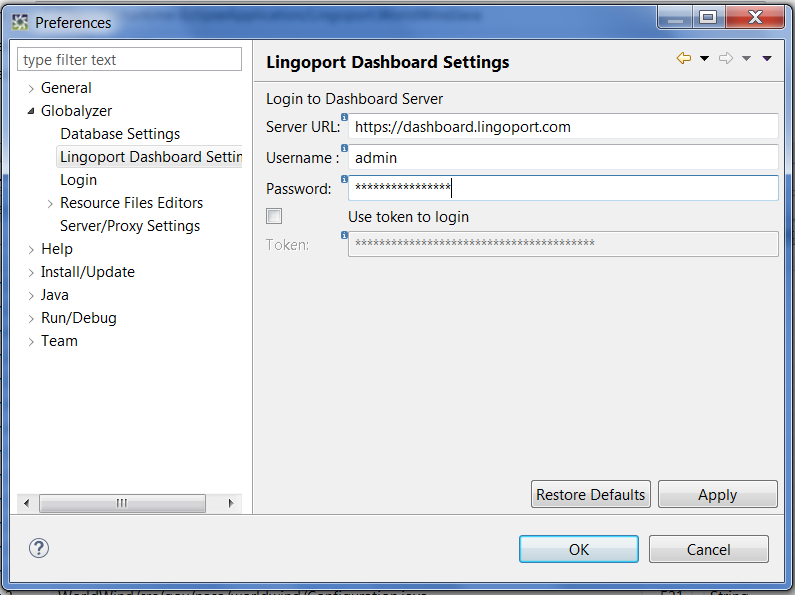
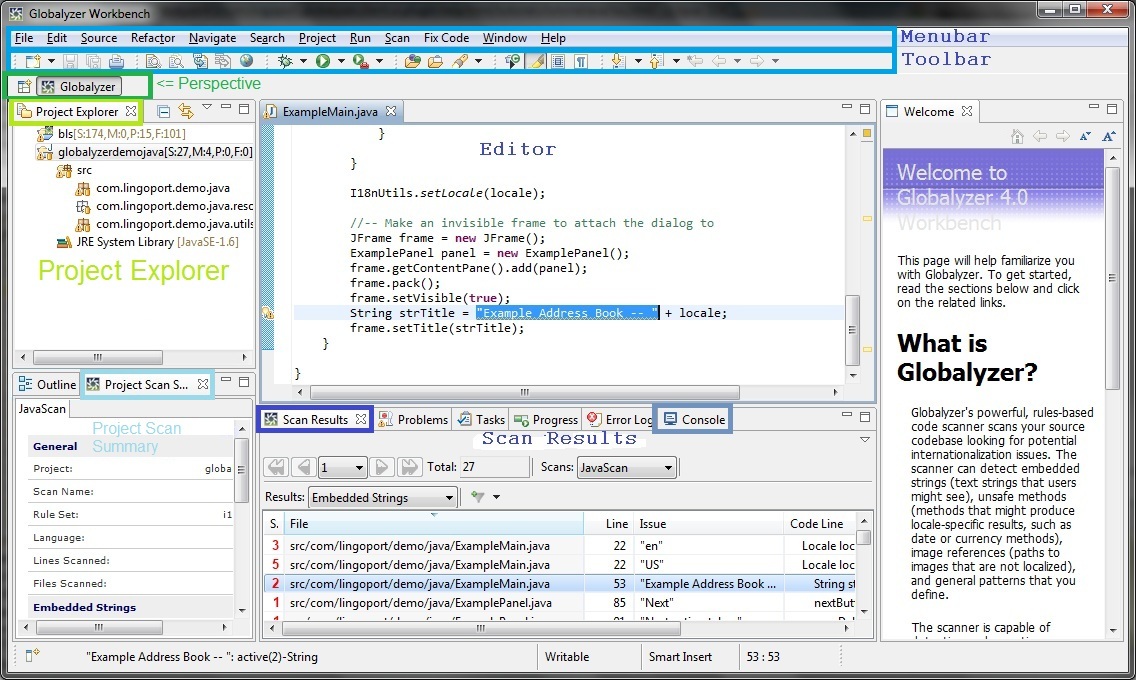
Specify the Server URL and then login information either setting Username/Password or using a token. If you want to login with a token, check "Use token to login". Click the Apply button to apply your settings and the Globalyzer Workbench will try to establish a connection to the Lingoport Dashboard with your settings. Globalyzer Window OverviewWhen you start Globalyzer, the application window appears, as shown below. The main parts of the interface are labeled, and briefly described below.
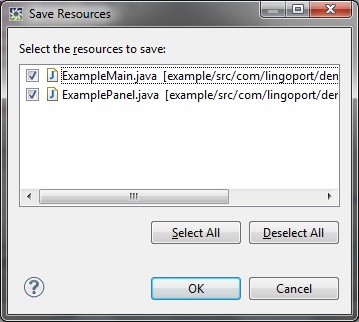
The Toolbar has buttons linked to the most common actions used in Globalyzer. All these can also be found in the Menubar. The Project Explorer view displays all the Eclipse projects, some of which may be Globalyzer projects. The Scan Results tab contains all the scan results. By using the dropdowns in this view you can navigate between different scans and/or result types, and apply and add views to the scan results. When you double-click on a row in the Scan Results table, Globalyzer will open the associated source file in the Editor Area and highlight the issue. The All Predicted Scan Summary tab displays summaries for all the scans in the current project. Each Results type (Embedded Strings, Locale-Sensitive Methods, General Patterns and Static File References) has its own section in each Summary. The Status view will display various messages. For example, during a scan, the names of individual files scanned will be displayed. Status messages are also written to the Console tab. Using GlobalyzerYou can configure the Globalyzer Client to use Rule Sets defined on the Server and set up other properties Globalyzer needs to perform a scan. For instance, you need to tell Globalyzer where to find source files to scan, where to put reports, and so on. These procedures are described in Configuring Rule Sets and Scanning Source Code. If you intend to use Globalyzer to fix code, then you also need to configure several project properties. For instance, you need to specify a method to replace embedded text that has been externalized. These properties and procedures are described in Fixing Source Code. Exiting GlobalyzerTo exit Globalyzer, select File=>Exit from the Menubar. Globalyzer will display a warning if there are unsaved Source File changes.
Only files that were modified since last being saved will show up in the list. To select or deselect a single file, click the checkbox next to the filename. Select All -- Selects all of the listed files. Deselect All -- Deselects all of the listed files. OK -- Saves the selected files and then exits Globalyzer. Cancel -- Closes the dialog box without saving any files: Exit is aborted. |


 User's Guide Contents