Externalizing Multiple Strings
In this lesson, you will use the Externalize Selected Strings
feature (also called batch externalization) to externalize multiple
strings at once.
Batch externalization is much faster than
externalizing one string at a time. However, batch externalization
is more error-prone than single-string externalization because it's
easier to externalize a string that shouldn't be externalized if
you don't examine each issue in the list very carefully.
Note: an online video guide is available for this section
of the tutorial. To see this video, as well as other Globalyzer
video tutorials, click
here. The video guide relevant to this tutorial is
titled Part Five: Externalizing String and Pseudo-Localization.
-
Select all of the remaining Embedded Strings in the Scan
Results table.
To do this you can click on an issue in the Scan Results
table and click on Select All. Alternatively, you can also
select the first row in the table then hold down the Shift
key and click on the last Embedded String row in the table. All
of the Embedded String results should be selected.
-
Right-click over the table and select Externalize Selected
Scan Results.
-
If you have made changes to any files, you will be asked to
select files to save. After this step, the following
externalization dialog appears:
You should have added a Globalyzer directive in the code to
ignore the
unused
string in a previous section. If that is not the case, please
make sure to de-select the
unused
string from the
@SuppressWarning
Java directive.
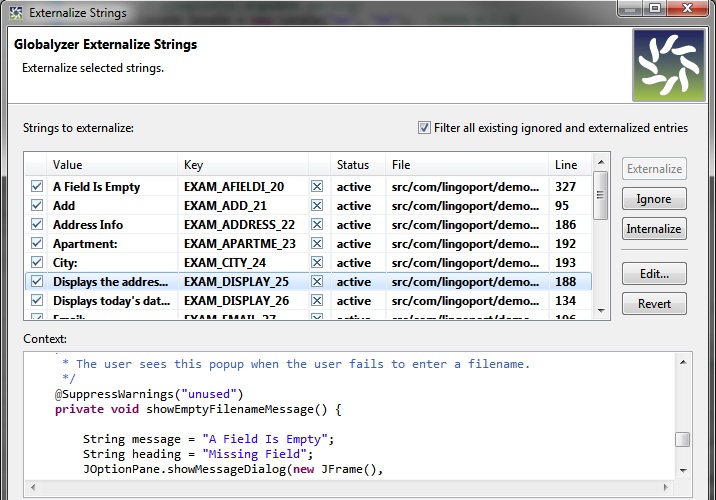
Note that the Externalize Strings dialog contains a multitude of
different features:
-
Like in the Scan Results view, clicking on an
issue in the Externalize Strings dialog will highlight the text of
the file it is contained in.
-
The dialog also presents the options to Ignore
specific issues via the Ignore button.
-
You can also choose to internationalize one of the listed strings. This
removes the Ignore comment if the issue was previously ignored, and sets
the status of the issue to Active. Otherwise, no action is performed.
-
Finally, you can Edit any of the strings that you are going to
externalize. Clicking the Edit button will bring up an Edit
Entry dialog. Within the dialog, the New key field allows
you to change the key value for selected issue. You can also edit
the string itself with the New value field.
-
Within the Globalyzer Externalize Strings dialog, click Next.
You will now see the Externalize Strings Messages section of the
dialog. This dialogue will show you which source files are going to be
modified.
-
Click Next again
You will now see the Externalize Strings Preview section of the
dialog. This section presents a final idea of what will be changed during
externalization. It also presents a final opportunity to reject any changes
you do not wish to make. If you do not wish to externalize a selected issue,
uncheck the checkbox to the issue's left. For this tutorial, leave all issues
as they are.
-
Click Finish.
Globalyzer externalizes all of the remaining strings and
performs the following actions:
- Replaces all of the embedded string errors in the source
files with the method call
I18nUtils.getString(...)
- Writes the automatically generated name/value pairs to
the resource file: exampleResources.properties
- Saves all of the affected source files.
The list of Embedded String issues should be empty now that
Globalyzer has finished its automated scan.
At this stage, you should have filtered out
Debug.log
string parameters by modifying the rule set, ignored the
unused
string, and externalized all user visible strings.
- There should be no more Active results in the Scan
Results view.
- The summary view should indicate 0 Embedded Strings
- You should be able to re-run the application as in the
verification step and see all the strings shown in English in the
user interface.
Note. If the string to be externalized is too long (string
length limit for string externalization is 255 characters), it is
not externalized during multiple string externalization. You should
use single string externalization (and make sure that the whole
string is selected in the source file), to externalize long
strings.
A French translation
Since the user visible strings are externalized, they can be
localized. This usually involves a process with a Localization
vendor who will translate files and send them back to be integrated
into the software. In this example, let's provide a simple French
translation for the text.
- Copy the content of the exampleResources.properties
into exampleResource_fr_FR.properties. You should find both
.properties files by using Globalyzer's Project Explorer to
navigate to example-source-java=>src=>com.lingoport.demo.java.resources.
Right click on each file and select Open
With=>Properties File Editor.
- Change the value of the text to the following translation.
The keys may be different in your string externalization,
depending on many factors, including the order in which you
externalized strings. Be sure to save your modifications.
 # SOURCE_FILE
								C:/tmp/example-source-java/src/com/lingoport/demo/java/ExampleMain.java

								EXAM_EXAMPLE_1=Carnet d'adresses --\

 # SOURCE_FILE
								C:/tmp/example-source-java/src/com/lingoport/demo/java/ExamplePanel.java

								EXAM_AFIELDI_20=Un champ est vide
 EXAM_ADD_21=Ajouter

								EXAM_ADDRESS_22=Information
 EXAM_APARTME_23=Apartment:\

								EXAM_CITY_24=Ville:\
 EXAM_DISPLAY_25=Montre les adresses
								dans le carnet.
 EXAM_DISPLAY_26=Montre la date et l'heure
								du jour
 EXAM_EMAIL_27=Email:\
 EXAM_EXIT_28=Fin

								EXAM_MISSING_29=Champ manquant
 EXAM_NAME_30=Nom:\

								EXAM_NEXT_31=Suivant
 EXAM_PHONE_32=Telephone:\

								EXAM_STREET_33=Rue:\
 EXAM_TIME_34=Heure:\

								EXAM_TODAYSD_35=La date du jour
 EXAM_TODAYSD_36=Date du
								jour:\
 EXAM_ZIPCODE_37=Code Postal:\
- Re-run the application by passing in a different locale:
to do so, right click on the top ExampleMain.java file and choose
the Run As=>Run Configurations ...

- A dialog box pops up. In the Arguments tabs, type
in the string fr_FR.
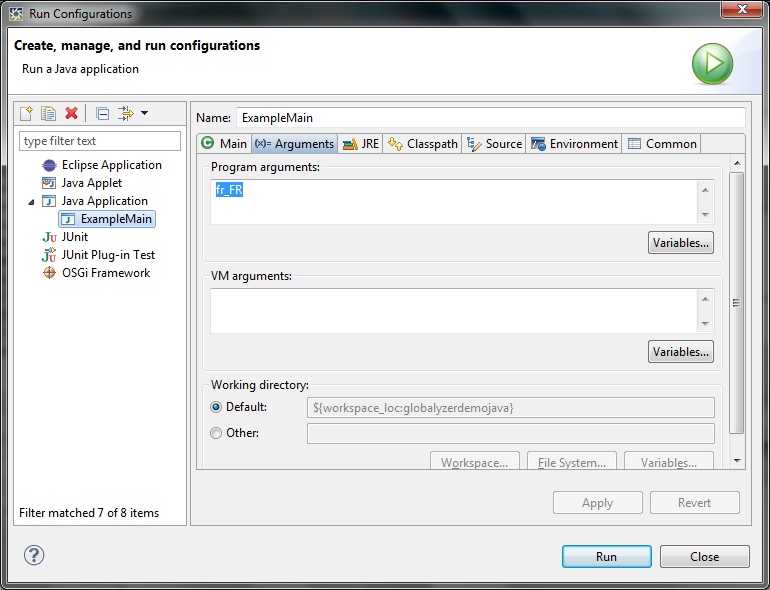
- Click Apply and Run. The translated strings
appear.
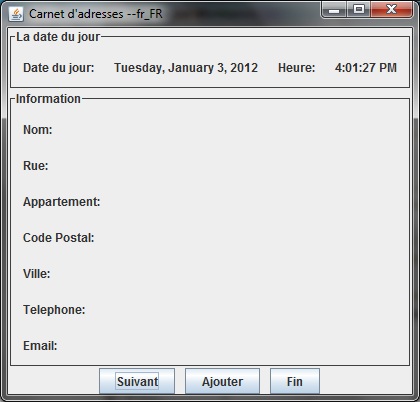
If the text has been handled and can now be translated, the
behavior of the application depends on the correct usage of
locale-sensitive methods. For instance, the date and time formats
are not correct for the chosen locale. In the next lesson, we will
discuss how to fix the project's two locale-sensitive methods.

 
|
