Externalizing an Embedded String
In this section, you will use Globalyzer to locate and
externalize the embedded strings that the scanner found in the
source file. You will also have Globalyzer insert an Externalized
String comment just above the line where the string was
externalized.
-
First we want to make sure that Globalyzer is set up to insert an
Externalized String comment each time a string is externalized.
Select Window=>Preferences=>Globalyzer and then
check the Automatically Insert Externalized String Comment
checkbox as shown here.
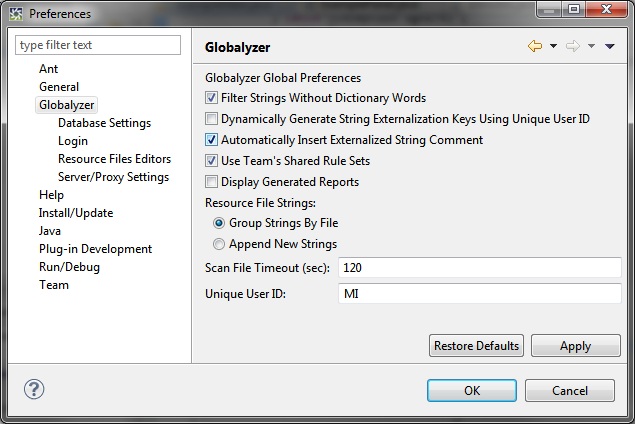
Click OK to save your changes.
-
Make sure Embedded Strings is selected in the Results
dropdown in the Scan Results view.
-
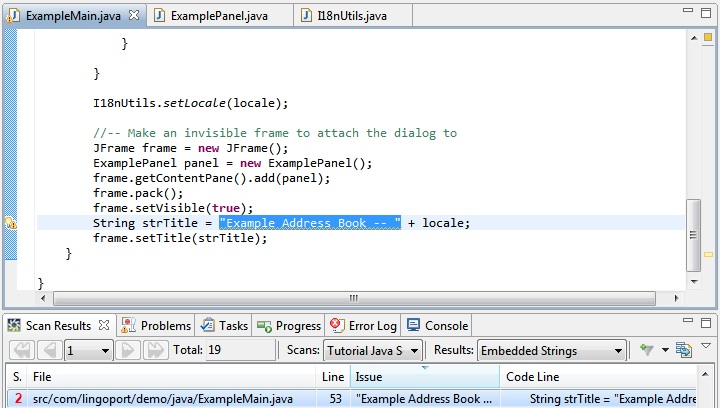
In the Scan Results table, double-click anywhere in the
row containing the issue Example Address Book. Remember
that this string is an issue because it represents display text,
i.e. text the user will see. In this case, it is the visible
title of the main application window. The issue is highlighted in
the Source File Editor view, as shown below.
-
Without deselecting the text, right click on the main panel and
select Globalyzer=>Externalize String.
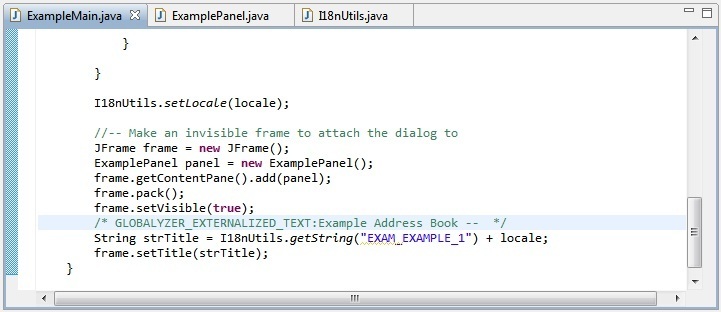
Note that the string "Example Address Book" has
been replaced by:
I18nUtils.getString("EXAM_EXAMPLE_1")
In addition, the comment, GLOBALYZER_EXTERNALIZED_TEXT:
Example Address Book has automatically been inserted into the
source code, above the modified line.
-
Globalyzer will automatically save your source file during string
externalization, but if you had made other changes, you would
save your work by selecting File=>Save in the Menu Bar,
or pressing Ctrl-S.
-
Using a Project Explorer on your system, navigate to the location
of your exampleResources.properties file and open it.
Note: exampleResources.properties will likely be located
under
C:\tmp\example-source-java\src\com\lingoport\demo\java\resources
-
The following lines appear in the file:
									# SOURCE_FILE {your path}/ExampleMain.java

										EXAM_EXAMPLE_1=Example Address Book
The name/value pair for the externalized string has been written
to the resource file. The key,
EXAM_EXAMPLE_1
, was automatically generated - you can customize this by
clicking the Edit Format button next to the String
Key Format field on the Globalyzer String Externalization
page of the scan configuration. (Select Scan=>Manage
Scans, select the scan to modify, select Modify, then
click Next, and Next again to get to the Globalyzer
String Externalization page.) This is the key used by the
myBundle.getString
method to retrieve the display text, Example Address Book.
Note: If these lines did not appear in your source file, the most likely issue
is that your scan's Resource File Path is configured incorrectly. Instructions
for properly configuring this setting are present in the previous tutorial page.
-
Once externalized, the entry will be removed from the Active
Scan Results table.
In the next lesson, you will use the Scan Results table to
externalize multiple strings at once using the Externalize
Selected Strings feature.

 
|
