Starting the Globalyzer Workbench
The Globalyzer Workbench is Lingoport's client-side graphical
user interface for internationalizing source code. It uses the
server-side Rule Sets to scan the source code for internationalization
issues and then has various features, including string externalization, to
analyze and fix the issues. This lesson explains
how to start the Globalyzer Workbench.
To install the Globalyzer Workbench, login to the
Globalyzer Server and then click on the Download the
Globalyzer Client link at the bottom of the page. Select the
appropriate installer and follow the instructions.
Login Credentials
-
Follow your platform-specific Globalyzer Client startup instructions below:
Windows Instructions:
- If you have followed the default Windows installation,
to start Globalyzer, double-click on the Globalyzer 6.8 icon on your desktop.
Linux Instructions:
- After downloading, double-click on the Globalyzer
6.8 shortcut on the desktop (if created and permissions are
set correctly)
- Or, select Globalyzer 6.8 from the Applications
menu (under Globalyzer)
- You can also run from a terminal window:
 $
										java -Xmx1024m -jar globalyzer-client.jar
Mac Instructions:
- After downloading, double-click on the globalyzer-client.jar
file under the install directory
- You can also run from the command line:
$ java -Xmx1024m -jar /Applications/Lingoport/Globalyzer-6.8/globalyzer-client.jar
-
If the startup process was successful, the login window
appears. If this is the first time you have logged in, the fields
will be empty.

-
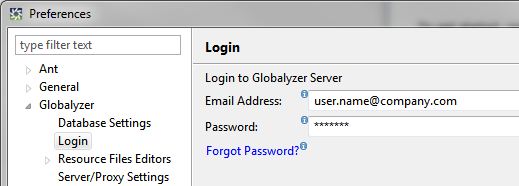
Enter your username (an email address) and password. When
you created your Globalyzer Server account, or the administrator
of your Globalyzer user group created your account, you should
have been emailed your username and password along with the login
URL.
By default the URL for Globalyzer is
https://www.globalyzer.com/gzserver.
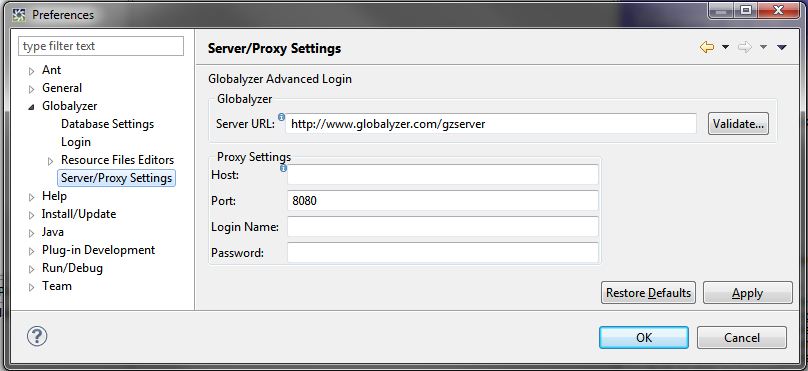
If you are using a different server, click the Connection
button and enter the server URL. You also enter proxy information in this
page if your company connects to the internet through a proxy server. The settings
can often be obtained directly from your web browser configuration. Leave the
Login Name and Password fields blank if you don't login to connect to the
internet.
For help with logging in, see your Globalyzer administrator. If
your company has a Globalyzer Enterprise License, then you will
have an internal Globalyzer Server, and this administrator will
be within your company. Otherwise, contact the Lingoport
Globalyzer administrator at support@lingoport.com.
-
Click OK in the Login Connections dialog.
-
Click OK in the Globalyzer Login dialog.
Once you login, Globalyzer will store your credentials and use them
the next time you start Globalyzer, bypassing the login dialog. You change
your login information from within the Globalyzer Workbench by selecting
Window=>Preferences and click on Globalyzer/Login to enter the updated login data.
As mentioned above, you will need to edit the server URL only if your company has a
Globalyzer Enterprise License. A regular Globalyzer License
accesses Lingoport's Globalyzer Server at https://www.globalyzer.com/gzserver,
which is the default setting. To edit the server URL, click
Server/Proxy Settings. Enter the server URL in the field provided. If you do
not know the URL, you can obtain it from your Globalyzer
Administrator, or from the Welcome to Globalyzer email
that you received after signing up for an account.
If you are connecting to a Globalyzer Server running within your
company's intranet (i.e., you have a Globalyzer Enterprise
License), it is unlikely that you will need to set the proxy
server settings, in which case you can leave them blank and can
now click OK in the Login Connections dialog. If you do
need to set proxy server information, see the next step.
In order to connect to the Globalyzer Server - whether it
is in-company or the Lingoport Globalyzer Server - through a
proxy server, you need to fill in all or some of the elements of
the Proxy Server Information section of this dialog box. The
settings can often be obtained directly from your web browser
configuration. Leave the Login Name and Password fields blank if
you don't login to connect to the internet.
Press Apply to save your changes. The Globalyzer Workbench
will reconnect to the Globalyzer Server using the new credentials.
Overview of the Globalyzer Workbench
After you have been successfully logged into the Globalyzer
Workbench, the main Globalyzer window appears. An example of the
window (with sample data and labels) is shown below.
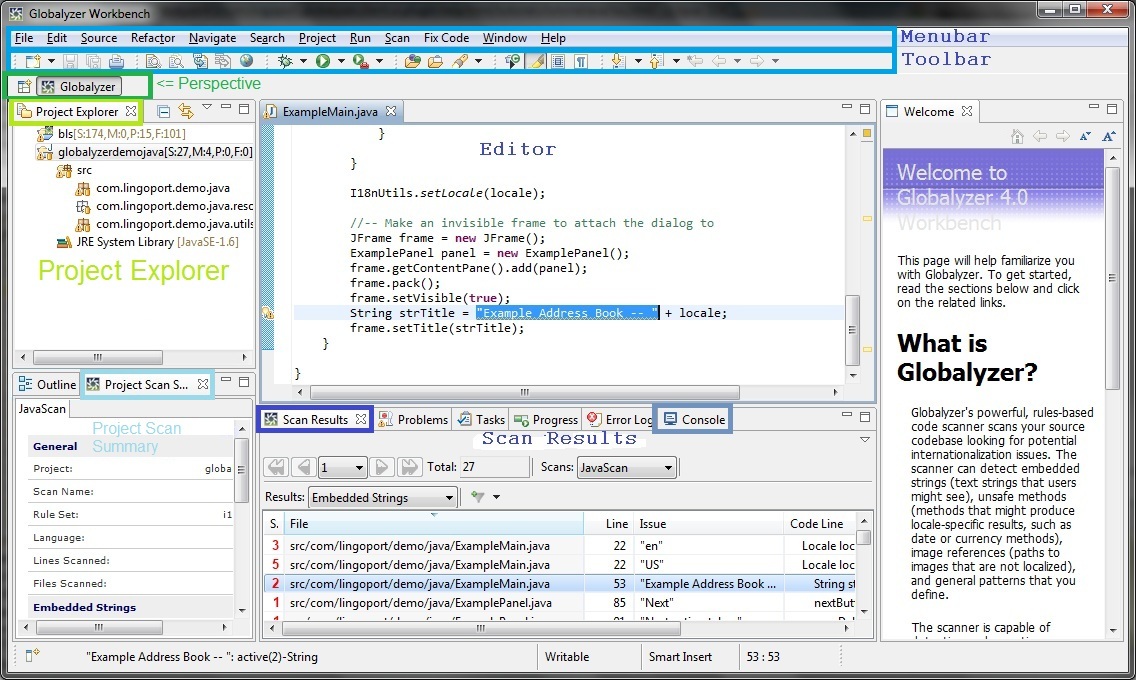
The Toolbar, highlighted in blue, has buttons linked to the
most common actions used in Globalyzer and other types of actions
depending on your own plugins and languages, such as compiling,
running, or debugging. The Globalyzer specific settings allow for
scanning, identifying, and fixing i18n issues. All these can also
be found in the Menu Bar, also highlighted in blue.
The Perspective bar, highlighted in green, shows different
views, related to some common actions. By default, the Globalyzer
perspective is shown; other perspectives may be configured, for
example to debug your application.
The Project Explorer view, highlighted in light green,
displays the current Java project along with its subdirectories and
files.
The Scan Results view, highlighted in purple, contains all
the scan results. By using the dropdowns in this view you can
navigate between different scans and/or result types, and apply and
add views of the scan results. Note: in the same group,
highlighted in grey, the Console view will display various
messages. For example, during a scan the names of individual files
scanned will be displayed.
When you double-click on a row in the Scan Results table,
Globalyzer will open the associated source file in the Editor
view and highlight the issue.
The All Predicted Scan Summary view, highlighted in light blue at
the mid left, displays a summary from the current scan. Each Results
type (Embedded Strings, Locale-Sensitive Methods,
General Patterns and Static File References) has its own section in the
Summary.
Getting Help
The Help menu offers a number of ways to get help. Some of
the help is dedicated to Globalyzer specific i18n technology, while
other help topics cover the Eclipse environment. Each plugin you
add may also include its own help.
Some dialog boxes include a question mark. Clicking on the
question mark will give you a contextual help for that particular
dialog box.
Cheet sheets are available within the help for some specific topics.
See Help=>Cheat Sheets... Topics covered range from "Creating a
Java Hello World application" to "Running Globalyzer's Project Files Inspector."
Tutorials illustrate some of the i18n functionality of
the Globalyzer Workbench.

 
|
